Snippets
Saving code that you often reuse in Espresso is much more flexible and powerful than many other editors thanks to Espresso's powerful snippet syntax.
Using snippets
There are several ways to access snippets:
- Insert built-in and custom snippets by choosing Actions ⟩ Show Snippets and then clicking the snippet you want to use
- Insert snippets through built-in tools (like CodeSense or zen coding)
Regardless how you insert a snippet, you will find that Espresso snippets offer several features that you will not find in other editors.
For instance, if you insert a snippet and find that some of the text is already selected or the cursor is somewhere in the middle of the snippet that typically means that the snippet includes tab stops. Tab stops are special areas in a snippet that you jump between using tab (to move forward) and shift tab (to move backward). If your snippet includes selected text try hitting tab to jump to other portions of it.
A common pattern in the snippets that are included with Espresso is to provide a default value and select it. If you want to use the default, you can hit tab again to start moving through the various parts of the snippet, and if you want to do something different, you can delete the default text and continue from there.
For instance, the CSS snippet that is inserted when you use CodeSense to create a background shorthand property looks like this:
![background: [#f5f5f5 url('../images/bg.jpg') no-repeat left top];](../images/css-bg-step-1.png)
The example text (selected in blue) assumes that you want to use all of the available portions (except background-attachment, which is left out since it is rarely used). If instead all you want is to specify a color, you can hit delete and then enter your color choice. If you do indeed want to use all of the shown items, you can start hitting tab to jump between them one at a time starting with the color:
![background: [#f5f5f5] url('../images/bg.jpg') no-repeat left top;](../images/css-bg-step-2.png)
Followed by the image path:
![background: #f5f5f5 url('[../images/bg.jpg]') no-repeat left top;](../images/css-bg-step-3.png)
And so forth.
You may also find some snippets that automatically fill out different areas depending on what you enter in a particular tab stop, or that insert default data like the selection before you inserted the snippet or similar. You will need to explore on a per-snippet basis what each does.
If you need to enter a literal tab character while in a tab stop, hit option tab.
Creating snippets
To create a new snippet, first open the snippets window by choosing Actions ⟩ Show Snippets. Then click the
 button. This will open the snippet management sheet:
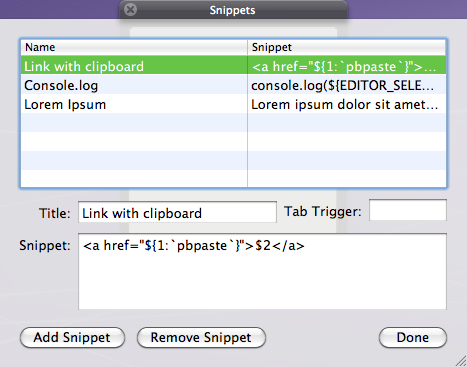
Here you can edit or remove existing snippets and add new snippets. Click a snippet to edit it, or click the Add Snippet button to create a new snippet.
There are several bits of information to enter for a snippet:
Quick tip
Remember that there are some characters that have special meaning in snippet syntax! If you need a literal dollar ($) or backtick (`), you will need to escape it with a backslash: \$ or \`.
- Title: this is what will be shown in the snippets window.
- Tab Trigger: if you enter anything here, you can automatically insert your snippet by typing whatever you entered and hitting tab. For instance, if you assign your snippet a tab trigger of
my_snippetthen whenever you typemy_snippetin the editor and hit tab, it will be replaced with your custom snippet. - Snippet: this is what will be inserted when you use your snippet's tab trigger or click it in the snippets window.
If you hit tab or enter in the snippet editor you will find that they do not enter any characters (instead they will move between fields or close the snippet management sheet, respectively). To enter a literal tab or enter character instead use option tab and option enter.
To find out how to use tab stops and other goodies in your snippet, you will need to use the special snippet syntax.
Once you are done modifying your snippets, click the Done button.